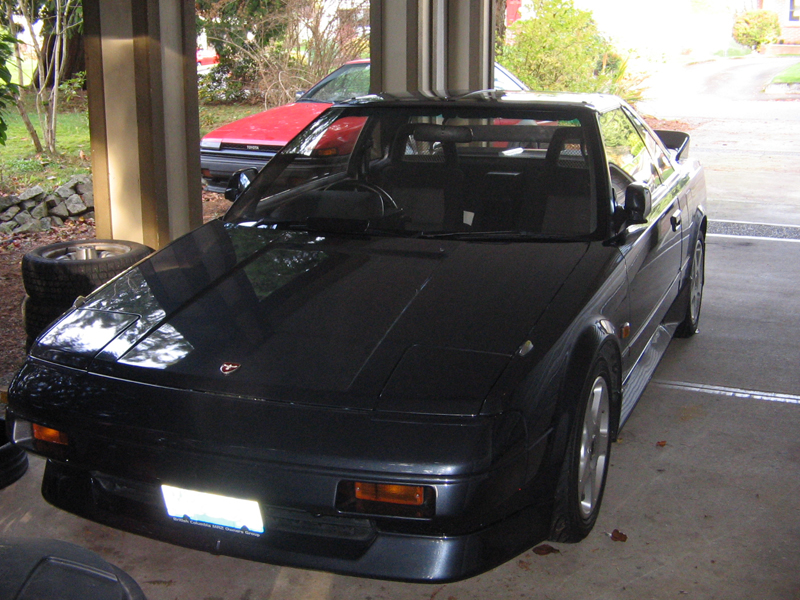
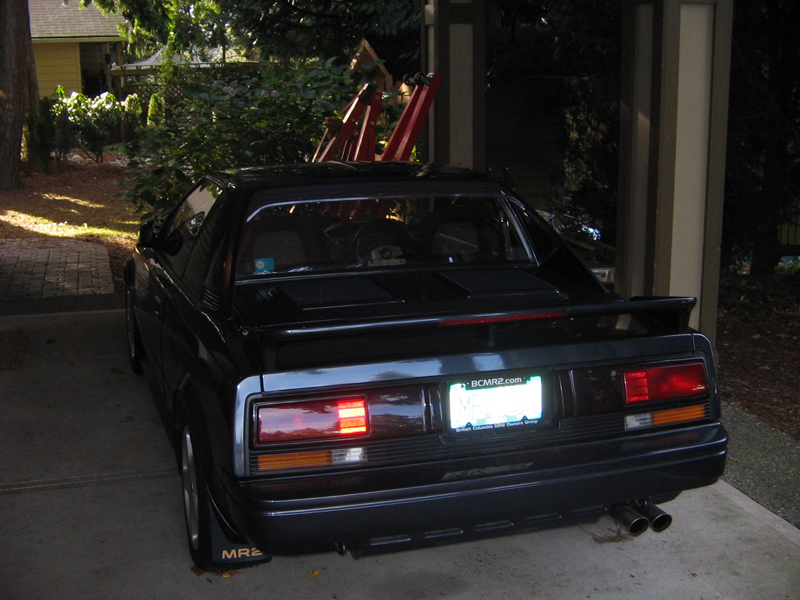
Project 4AGZE Restoration
Welcome to Matt’s winter of 2008/2009 project. This winter I will be restoring my supercharged engine. These are some of the things I will be doing to my engine:
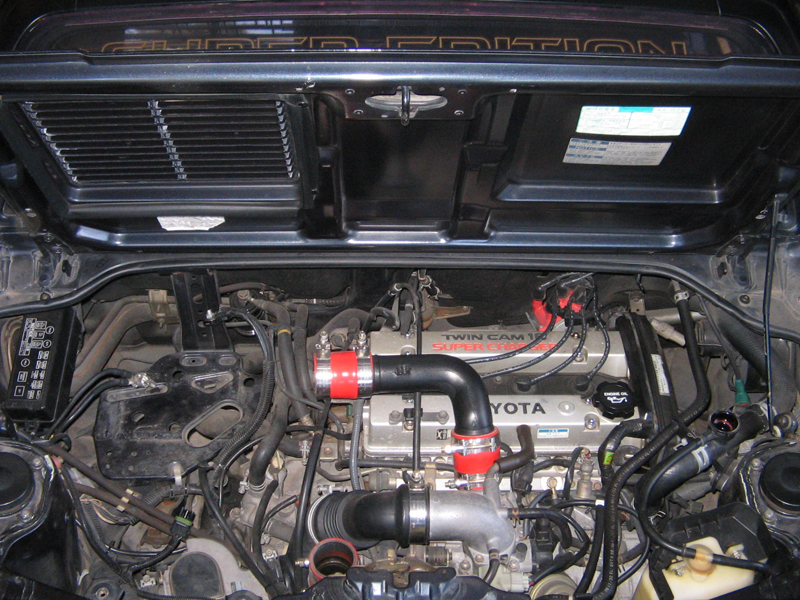
1-Change my supercharger as it has a bearing knock
2-While I am at it, I want to replace all seals and gaskets
3-It’s time for a new timing belt anyway plus for the peace of mind I would like to change my Timing belt tensioner, water pump, all belts and pulleys etc etc.
4-Restore my engine and drive-train to look brand new and to OEM standards by means of powder/ceramic coating or new parts period.
Currently I have only 130000kms on this engine and it is as strong as it was brand new. THere is nothing wrong with the engine itself. This is not a engine rebuilt but an engine cosmatic face lift. All internals will be left alone. Now I do not need to drop the engine to do any of the above with the exception of reason number 4, but it just makes it so much easier. I will be using all OEM parts on this car. My goal it to make my engine look like it just rolled out of the factory. So join me, if you wish, in my unnecessary but rewarding journey of pain and joy.
Estimated cost of this project $1700-$2000
Project 4AGZE Restoration
Moderators: Administrator, Executive Members, Moderator Group
Project 4AGZE Restoration
![]() by 4agzeSE » Wed Nov 26, 2008 9:32 pm
by 4agzeSE » Wed Nov 26, 2008 9:32 pm
-Matt
89 MR2 SuperCharger SuperEdition= SOLD
86 Corolla GTS= Daily Driver
89 MR2 SuperCharger SuperEdition= SOLD
86 Corolla GTS= Daily Driver
-

4agzeSE - MR2 Veteran
- Posts: 4053
- Joined: Wed Aug 31, 2005 10:50 am
- Location: Sunrise Toyota Abbotsford
- Status: Offline
Re: Project 4AGZE Restoration
![]() by 4agzeSE » Wed Nov 26, 2008 9:33 pm
by 4agzeSE » Wed Nov 26, 2008 9:33 pm
.
Chapter ONE - Engine removal
Day 1
Date: Monday November 24th 2008
Music: Tragically hip Greatest hits (both volumes)
Money spent to date: Zip
Hours spent to date: 3 hours
1-Drained engine oil
2-Drained Transaxle great oil

3-Removed battery terminals
4-Removed intercooler
5-Removed battery hold down, battery and tray
6-Removed engine side panels
7-Removed rear strut bar
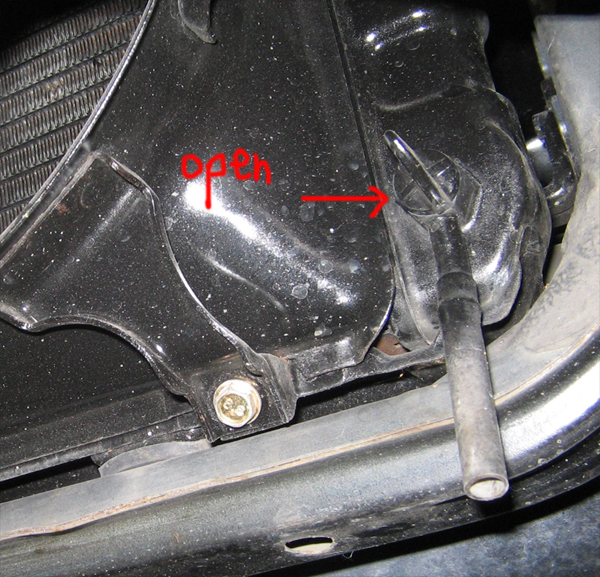
8-Removed radiator cap
9-Chucked the front wheels
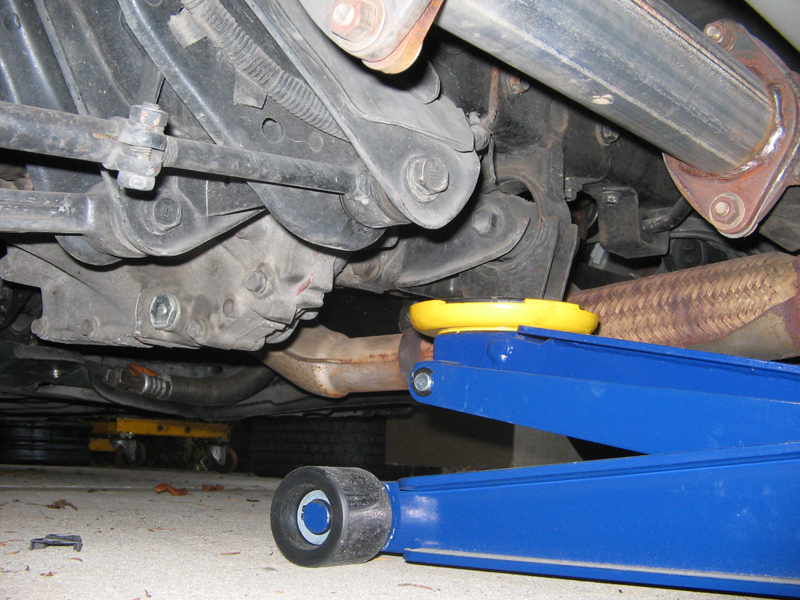
10-Jacked up the car by the rear engine mount.
11-Secured car on jack stands
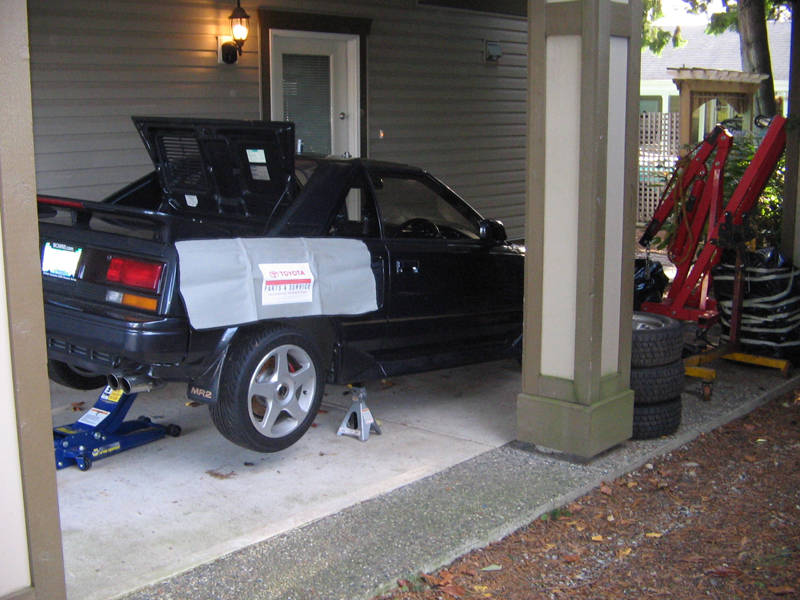
12-Drained radiator fluid into a pan by opening the radiator drain valve.
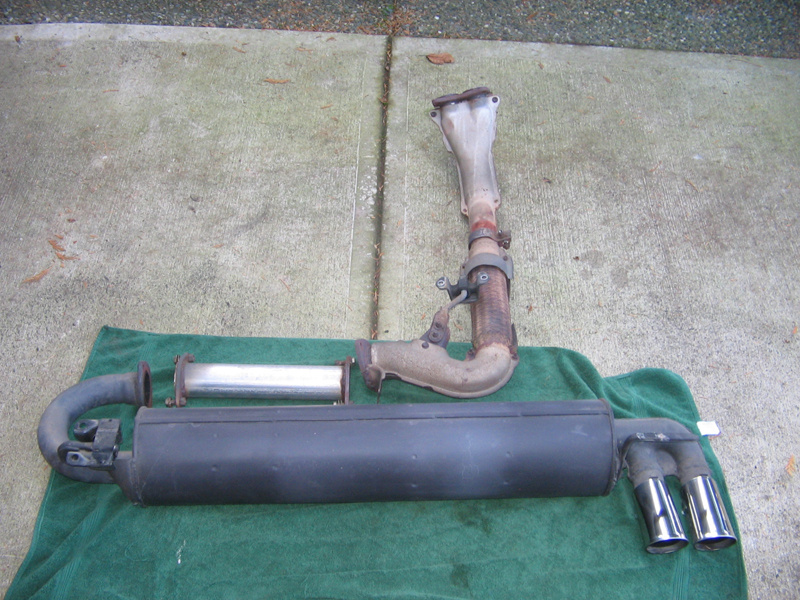
13-Left the car jacked up and removed muffler and down-pipe
14-Removed engine under cover

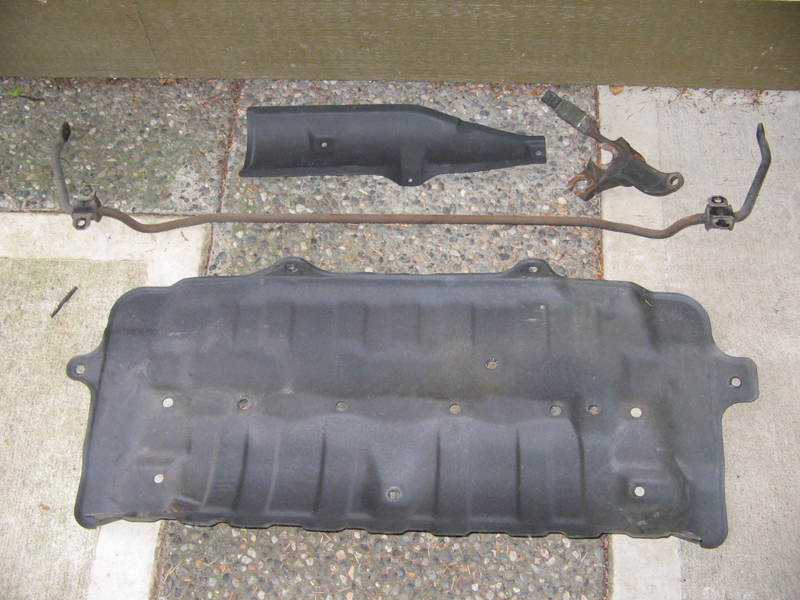
15-Removed sway bar and muffler heat shields (these parts will be powerder coated)

16-Removed speedo cables from transmission
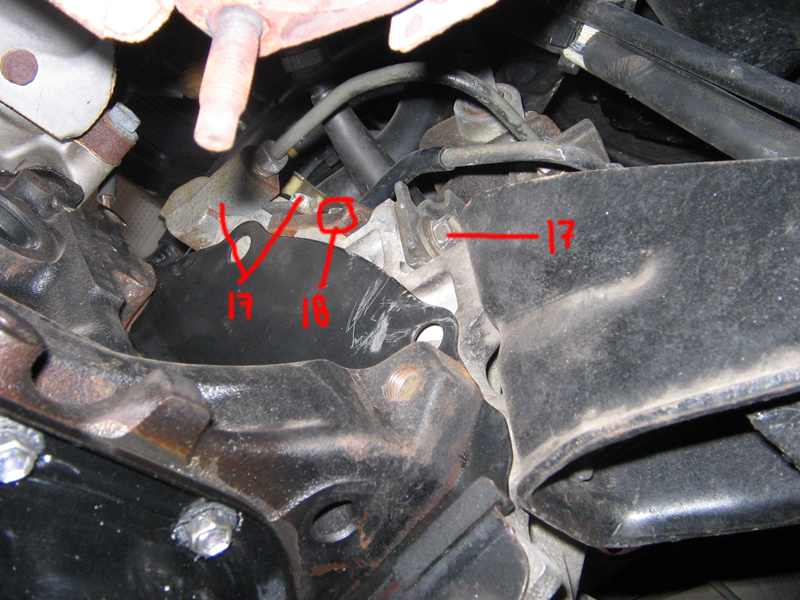
17-Removed slave cylinder
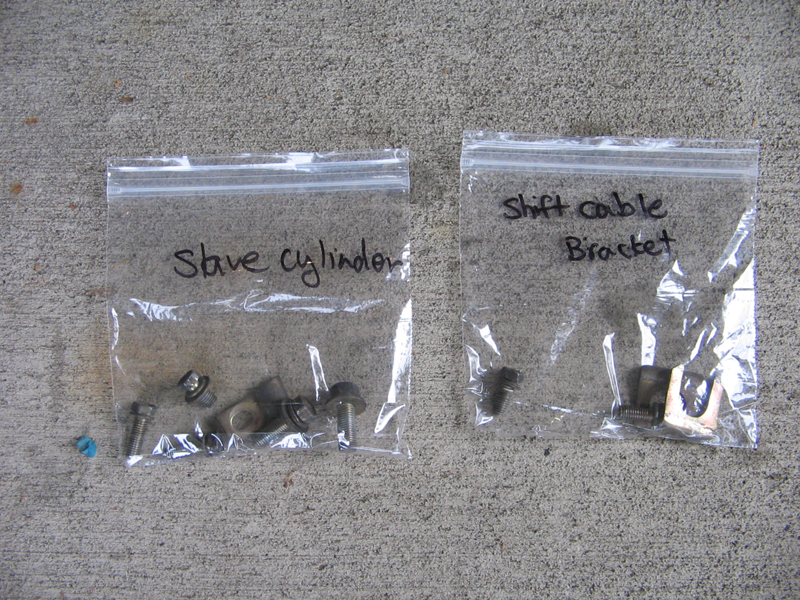
18-Removed slave speedo cable bracket (this bracket will be power coated)

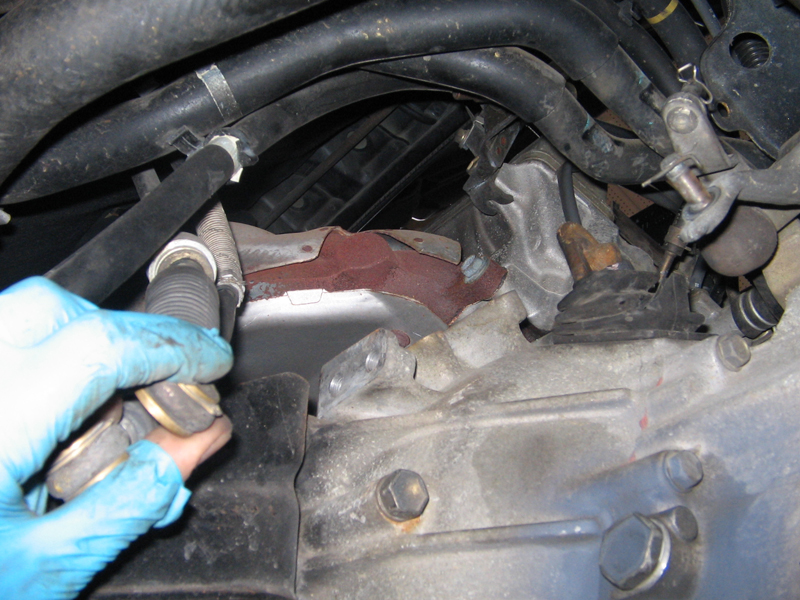
I also bag and tag every single bolt I off to make sure everything gets installed where it is supposed to be.
My powder and ceramic coating pile so far...
So this is what I did on Monday. Unfortunately these days when I get off work at 5:30 it is completely dark and cold outside so it is harder to work on the car in the evenings. I’ll wait till the weekend before I do more work. I must say my car is a real treat to work on. Everything comes apart so easily. No rusted bolts or nuts....no stripped bolts. I love my car!
Chapter ONE - Engine removal
Day 1
Date: Monday November 24th 2008
Music: Tragically hip Greatest hits (both volumes)
Money spent to date: Zip
Hours spent to date: 3 hours
1-Drained engine oil
2-Drained Transaxle great oil
3-Removed battery terminals
4-Removed intercooler
5-Removed battery hold down, battery and tray
6-Removed engine side panels
7-Removed rear strut bar
8-Removed radiator cap
9-Chucked the front wheels
10-Jacked up the car by the rear engine mount.
11-Secured car on jack stands
12-Drained radiator fluid into a pan by opening the radiator drain valve.
13-Left the car jacked up and removed muffler and down-pipe
14-Removed engine under cover
15-Removed sway bar and muffler heat shields (these parts will be powerder coated)
16-Removed speedo cables from transmission
17-Removed slave cylinder
18-Removed slave speedo cable bracket (this bracket will be power coated)
I also bag and tag every single bolt I off to make sure everything gets installed where it is supposed to be.
My powder and ceramic coating pile so far...
So this is what I did on Monday. Unfortunately these days when I get off work at 5:30 it is completely dark and cold outside so it is harder to work on the car in the evenings. I’ll wait till the weekend before I do more work. I must say my car is a real treat to work on. Everything comes apart so easily. No rusted bolts or nuts....no stripped bolts. I love my car!
-Matt
89 MR2 SuperCharger SuperEdition= SOLD
86 Corolla GTS= Daily Driver
89 MR2 SuperCharger SuperEdition= SOLD
86 Corolla GTS= Daily Driver
-
4agzeSE - MR2 Veteran
- Posts: 4053
- Joined: Wed Aug 31, 2005 10:50 am
- Location: Sunrise Toyota Abbotsford
- Status: Offline
Re: Project 4AGZE Restoration
![]() by cam_132 » Wed Nov 26, 2008 11:20 pm
by cam_132 » Wed Nov 26, 2008 11:20 pm
Wow, that is a big job...
its good that a nother mk1 is being restored... and ya i can see you droping the engine, its a pain in the but even without the SC...
Good Job matt!!!
Cam
its good that a nother mk1 is being restored... and ya i can see you droping the engine, its a pain in the but even without the SC...
Good Job matt!!!
Cam
Ruus wrote:
once an mr2 owner, always an mr2 owner. Its the love of the car that brings us together, not the owning of one.
-

cam_132 - Papa '2
- Posts: 671
- Joined: Tue Oct 14, 2008 9:20 pm
- Location: Maple ridge, bc
- Status: Offline
Re: Project 4AGZE Restoration
![]() by bbarnumboy » Thu Nov 27, 2008 2:20 am
by bbarnumboy » Thu Nov 27, 2008 2:20 am
he is not just restoring another mk1 but he is restoring theeee MK1 super edition. glad to see the project on a roll so far matt. all that powder coating will look very good. thought about ceramic coating and or polishing the tranny?.......well this will be great. be sure to get a new oil pump along with that water pump. hope to give a hand the weekend of the x-mas party. if time will let us. well it will all be worth it in the end. and i know tyou will do everything to spec and with oem quality. in the end it will probably be better than off the lot brand new. well keep us updated on this journey since it will take a while with the limited time you are able to work on it, being so damn cold in the winter time. good luck
God created turbo lag to give the v8's a brief moment of hope
-

bbarnumboy - MR2 know it all
- Posts: 3097
- Joined: Sat May 06, 2006 12:08 pm
- Location: Everett, WA
- Status: Offline
Re: Project 4AGZE Restoration
![]() by cam_132 » Thu Nov 27, 2008 4:25 pm
by cam_132 » Thu Nov 27, 2008 4:25 pm
What is the difference between the normal SC and the SC Super Edition?
Ruus wrote:
once an mr2 owner, always an mr2 owner. Its the love of the car that brings us together, not the owning of one.
-
cam_132 - Papa '2
- Posts: 671
- Joined: Tue Oct 14, 2008 9:20 pm
- Location: Maple ridge, bc
- Status: Offline
Re: Project 4AGZE Restoration
![]() by 86blkmr2 » Thu Nov 27, 2008 5:38 pm
by 86blkmr2 » Thu Nov 27, 2008 5:38 pm
Good stuff Matt! I'll be keeping a watch on this thread. Very interesting stuff. BTW, if you're chucking your front wheels can I have them? 
-

86blkmr2 - Junior '2
- Posts: 436
- Joined: Mon Oct 07, 2002 10:13 pm
- Status: Offline
Re: Project 4AGZE Restoration
![]() by 4agzeSE » Thu Nov 27, 2008 5:53 pm
by 4agzeSE » Thu Nov 27, 2008 5:53 pm
86blkmr2 wrote:if you're chucking your front wheels can I have them?
LOL sorry I think I am spelling it wrong but what I mean is securing the fron wheels so my car doesn't roll....chuck the wheels...or however you spell it....
-Matt
89 MR2 SuperCharger SuperEdition= SOLD
86 Corolla GTS= Daily Driver
89 MR2 SuperCharger SuperEdition= SOLD
86 Corolla GTS= Daily Driver
-
4agzeSE - MR2 Veteran
- Posts: 4053
- Joined: Wed Aug 31, 2005 10:50 am
- Location: Sunrise Toyota Abbotsford
- Status: Offline
Re: Project 4AGZE Restoration
![]() by bbarnumboy » Thu Nov 27, 2008 9:11 pm
by bbarnumboy » Thu Nov 27, 2008 9:11 pm
cam_132 wrote:What is the difference between the normal SC and the SC Super Edition?
look it up lol.
God created turbo lag to give the v8's a brief moment of hope
-
bbarnumboy - MR2 know it all
- Posts: 3097
- Joined: Sat May 06, 2006 12:08 pm
- Location: Everett, WA
- Status: Offline
Re: Project 4AGZE Restoration
![]() by cam_132 » Fri Nov 28, 2008 1:20 pm
by cam_132 » Fri Nov 28, 2008 1:20 pm
 Do i have to!
LOL jk
Google or Wiki?
Ruus wrote:
once an mr2 owner, always an mr2 owner. Its the love of the car that brings us together, not the owning of one.
-
cam_132 - Papa '2
- Posts: 671
- Joined: Tue Oct 14, 2008 9:20 pm
- Location: Maple ridge, bc
- Status: Offline
Re: Project 4AGZE Restoration
![]() by immorality » Fri Nov 28, 2008 4:59 pm
by immorality » Fri Nov 28, 2008 4:59 pm
-

immorality - BCMR2 Web Admin & Executive Board Member
- Posts: 9730
- Joined: Thu Oct 31, 2002 1:32 pm
- Location: Burnaby
- Status: Offline
Re: Project 4AGZE Restoration
![]() by Bravo 5 » Fri Nov 28, 2008 9:18 pm
by Bravo 5 » Fri Nov 28, 2008 9:18 pm
NICE... this is what I like to see. An MR2 kept in all its original glory. This is what I want to do with my 85 as well... too bad I have no mechanical skills or tools to do it!
1985 MR2, 1989 SC, 1991 n/a
Collector of MR2 memorabilia
Collector of MR2 memorabilia
-

Bravo 5 - Grandfather '2
- Posts: 1603
- Joined: Tue Feb 17, 2004 11:14 pm
- Location: Vancouver, BC
- Status: Offline
Re: Project 4AGZE Restoration
![]() by 4agzeSE » Fri Nov 28, 2008 9:23 pm
by 4agzeSE » Fri Nov 28, 2008 9:23 pm
Day 2
Date: Thursday November 27th 2008
Music: Sublime
Money spent to date: Still Zip
Hours spent to date: 6 hours
OK guys …I couldn’t just sit there and watch my poor car half apart and not do anything till the weekend. So I put on six layers and out I went. Here is what I accomplished Thursday night in 3 hours.
Thankfully I had lots of light!!!!
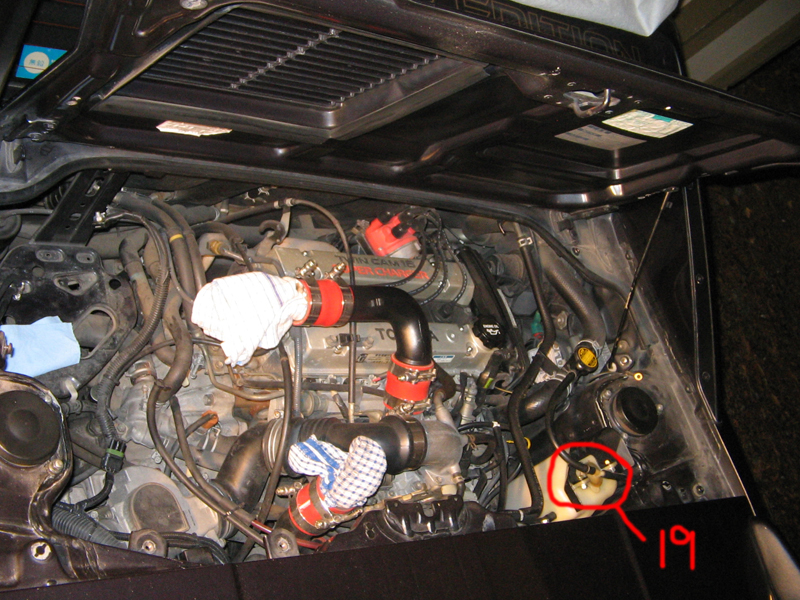
19- Removed coolant reservoir tank
20- Removed Brake Booster vacuum hose
21- Disconnected Engine upper rad hose

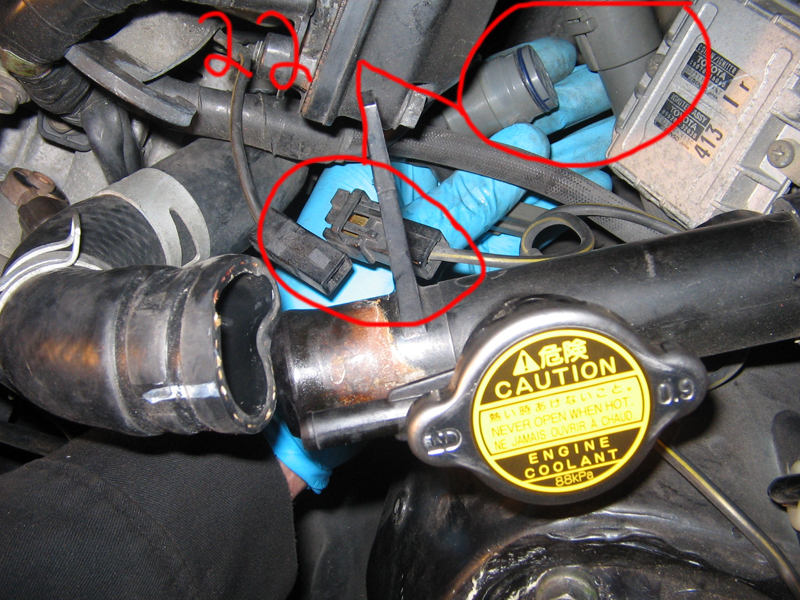
22- Disconnected Engine Ground wire and Igniter connector and Solenoid resistor connector.
23- Disconnected Lead from dizzy cap to coil
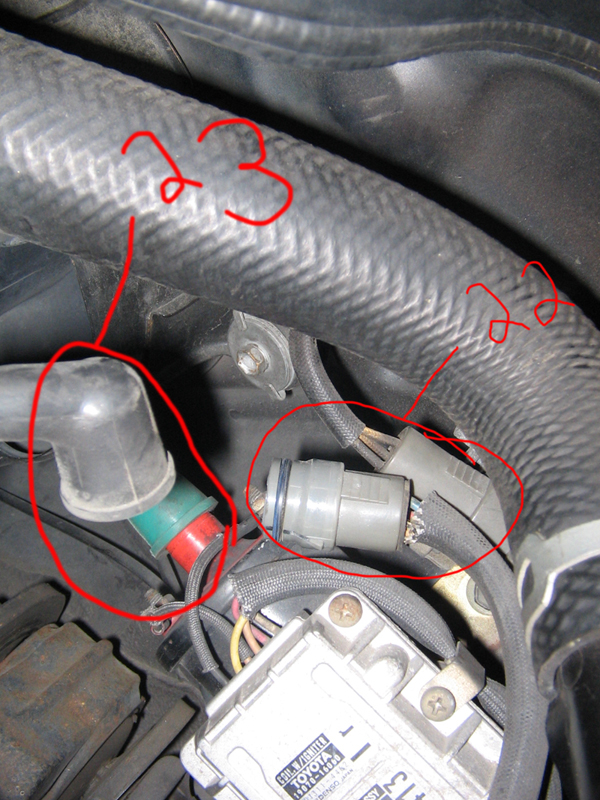
24- Disconnected side fan connector
25- Removed Supercharger VSV (vacuum switching valve)

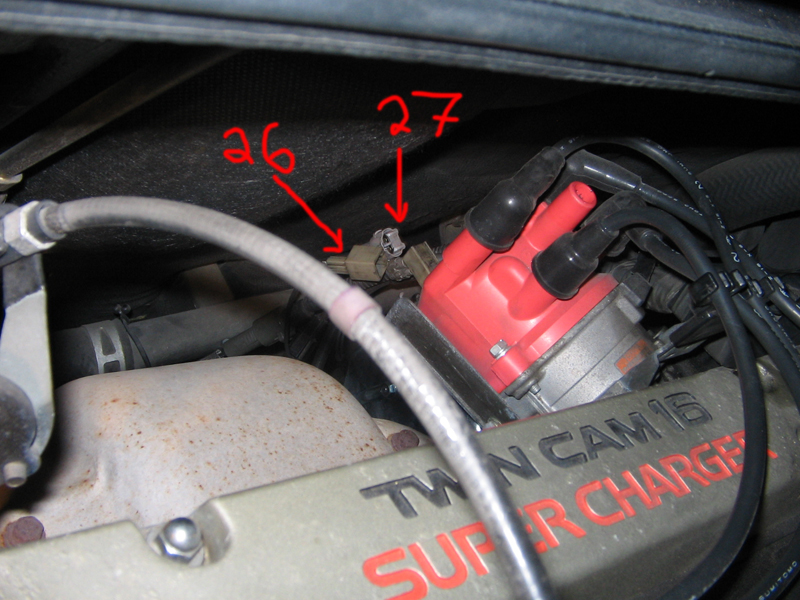
26- Disconnected A/C coil wire
27- Disconnected A/C revolution detecting sensor wire
28- Removed Charcoal Canister vacuum hose
29- Disconnected Air hose from intake pipe

30- Disconnected fuel line to fuel filter and fuel return line

31- Disconnected throttle cable from throttle body

32- Unbolted Air Flow Meter, removed connector and removed from car along with air hoses upto the air inlet pipe.
33- Disconnected Speedo Cable
34- Disconnected Heater Hoses and Lower Engine Rad Hose
35- Disconnected Back up switch
36- Disconnected Tranny Ground wire
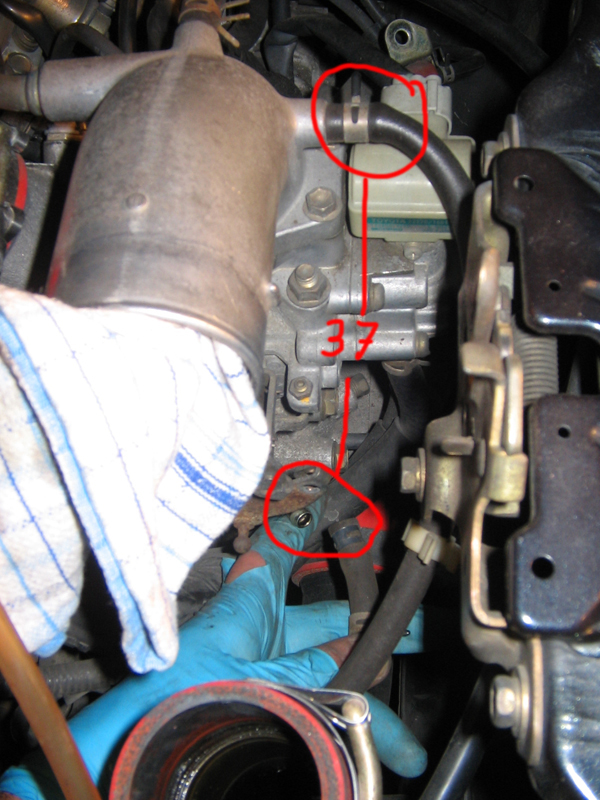
37- Disconnected upper and lower Idle-up vacuum hoses of the throttle body
38- Removed belt by loosening the idler bolt from the bottom

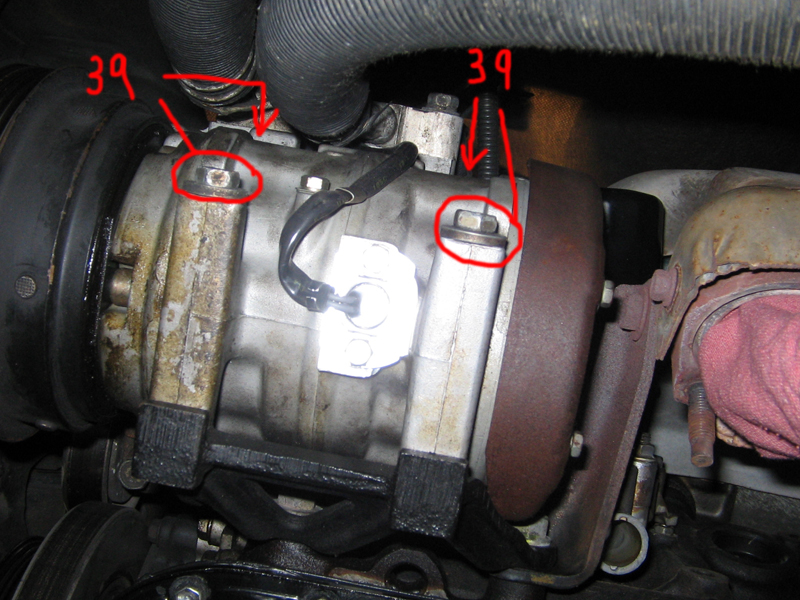
39- Removed A/C compressor 4 bolts. Lowered and secured the compressor onto a wooden step without putting any pressure or stress on the A/C lines. ( This is critical to insure no damage to A/C lines and connectors)
40- Removed all Trunk Carpeting
41- Disconnected wiring harness from ECU, Voltage regulator, couple of relays etc located in the trunk.

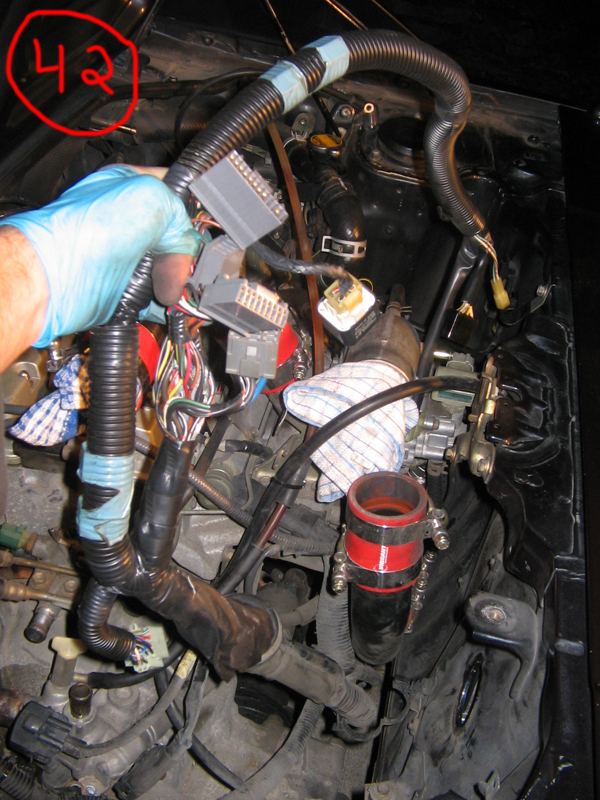
42- Then pulled the wiring harness into the engine compartment. I KNOW…I KNOW… you are thinking to yourself “Holy shit balls …Matt…that looks scary!!!!” but it is not. BGB (Toyota Repair Manual) instructs to do it this way. It is very easy. It only took me 10 minutes to remove all the carpeting in the trunk, disconnect all wire and pull the harness into the engine bay. Lets face it, this way you can remove/disconnect all sensors when the engine is out of the car. There will be more room to work with so you can take your time to ensure you do not damage any clips/connectors and properly mark everything as you remove….
43- Disconnected one clip from the battery platform
44- Disconnected wiring harness connector on the left side of engine bay.

Engine is pretty much ready to come out now. All I have to do is remove Axle shafts, remove 4 engine mounts and she is ready to come out. Engine will be out this weekend…..YAY!!!!

Date: Thursday November 27th 2008
Music: Sublime
Money spent to date: Still Zip
Hours spent to date: 6 hours
OK guys …I couldn’t just sit there and watch my poor car half apart and not do anything till the weekend. So I put on six layers and out I went. Here is what I accomplished Thursday night in 3 hours.
Thankfully I had lots of light!!!!
19- Removed coolant reservoir tank
20- Removed Brake Booster vacuum hose
21- Disconnected Engine upper rad hose
22- Disconnected Engine Ground wire and Igniter connector and Solenoid resistor connector.
23- Disconnected Lead from dizzy cap to coil
24- Disconnected side fan connector
25- Removed Supercharger VSV (vacuum switching valve)
26- Disconnected A/C coil wire
27- Disconnected A/C revolution detecting sensor wire
28- Removed Charcoal Canister vacuum hose
29- Disconnected Air hose from intake pipe
30- Disconnected fuel line to fuel filter and fuel return line
31- Disconnected throttle cable from throttle body
32- Unbolted Air Flow Meter, removed connector and removed from car along with air hoses upto the air inlet pipe.
33- Disconnected Speedo Cable
34- Disconnected Heater Hoses and Lower Engine Rad Hose
35- Disconnected Back up switch
36- Disconnected Tranny Ground wire
37- Disconnected upper and lower Idle-up vacuum hoses of the throttle body
38- Removed belt by loosening the idler bolt from the bottom
39- Removed A/C compressor 4 bolts. Lowered and secured the compressor onto a wooden step without putting any pressure or stress on the A/C lines. ( This is critical to insure no damage to A/C lines and connectors)
40- Removed all Trunk Carpeting
41- Disconnected wiring harness from ECU, Voltage regulator, couple of relays etc located in the trunk.
42- Then pulled the wiring harness into the engine compartment. I KNOW…I KNOW… you are thinking to yourself “Holy shit balls …Matt…that looks scary!!!!” but it is not. BGB (Toyota Repair Manual) instructs to do it this way. It is very easy. It only took me 10 minutes to remove all the carpeting in the trunk, disconnect all wire and pull the harness into the engine bay. Lets face it, this way you can remove/disconnect all sensors when the engine is out of the car. There will be more room to work with so you can take your time to ensure you do not damage any clips/connectors and properly mark everything as you remove….
43- Disconnected one clip from the battery platform
44- Disconnected wiring harness connector on the left side of engine bay.
Engine is pretty much ready to come out now. All I have to do is remove Axle shafts, remove 4 engine mounts and she is ready to come out. Engine will be out this weekend…..YAY!!!!
-Matt
89 MR2 SuperCharger SuperEdition= SOLD
86 Corolla GTS= Daily Driver
89 MR2 SuperCharger SuperEdition= SOLD
86 Corolla GTS= Daily Driver
-
4agzeSE - MR2 Veteran
- Posts: 4053
- Joined: Wed Aug 31, 2005 10:50 am
- Location: Sunrise Toyota Abbotsford
- Status: Offline
Re: Project 4AGZE Restoration
![]() by 4agzeSE » Fri Nov 28, 2008 9:40 pm
by 4agzeSE » Fri Nov 28, 2008 9:40 pm
Day 3
Date: Friday November 28th 2008
Music: None
Money spent to date: $34.68
Hours spent to date: 6.5 hours
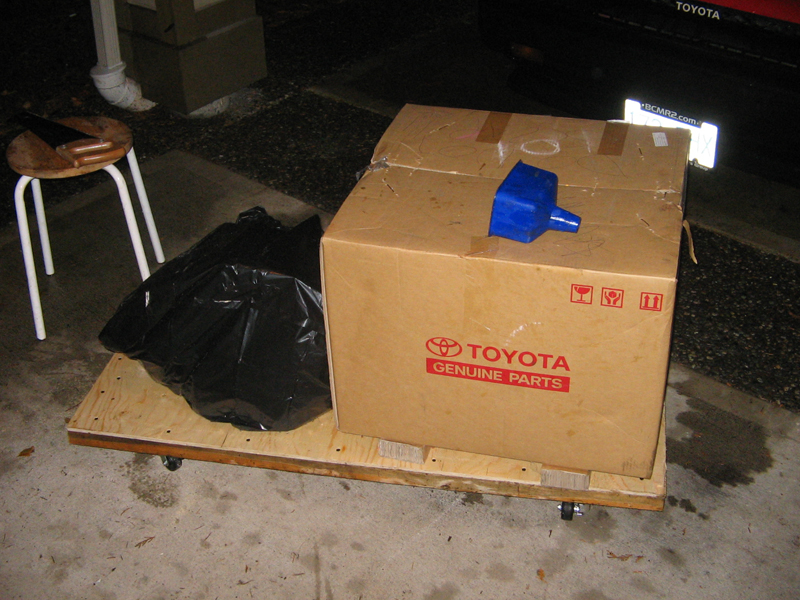
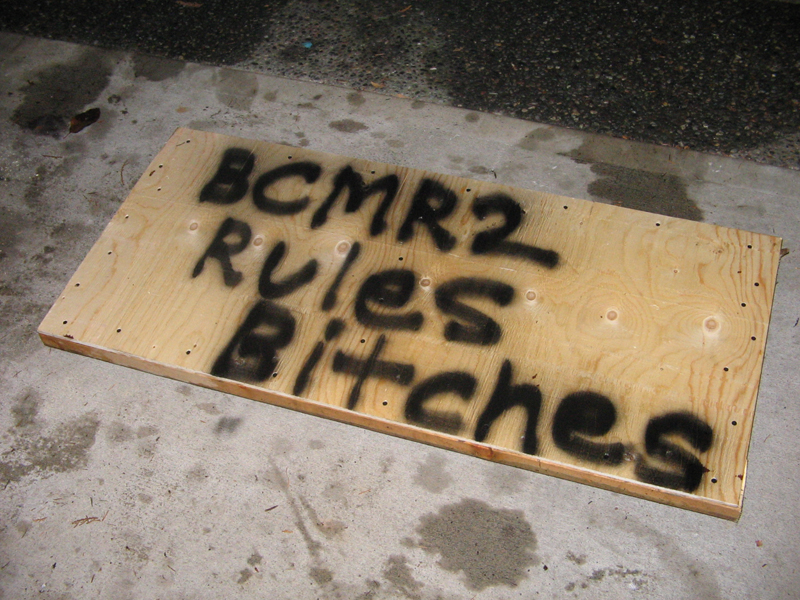
So I need something to lower my engine and tranny onto and roll it out from under the car. A proper engine and tranny dolly will cost over $200 and frankly I do not have the money for it. So I had to compromise. I decided to make my own dolly to lower my engine on and ROLLLLLL out from under my car.
So I went and bought $34.68 worth of wood and wheels....
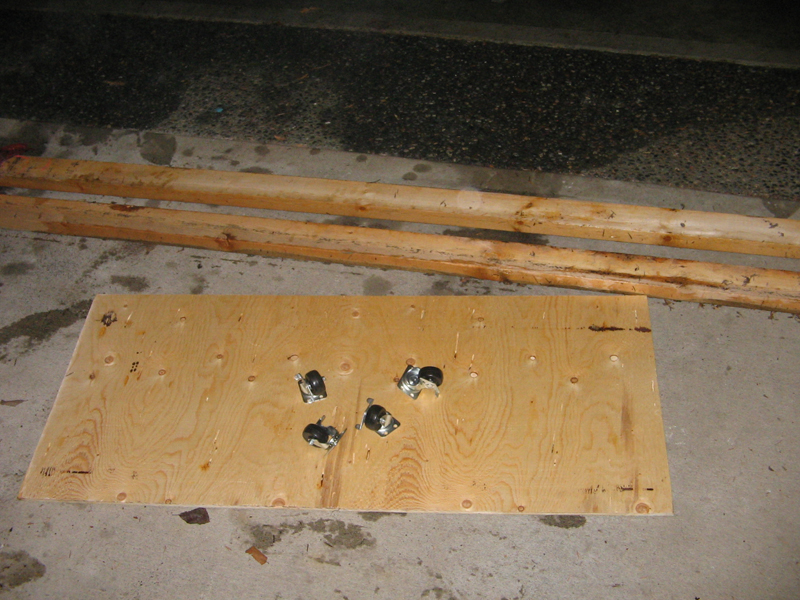
And then turned it into this….
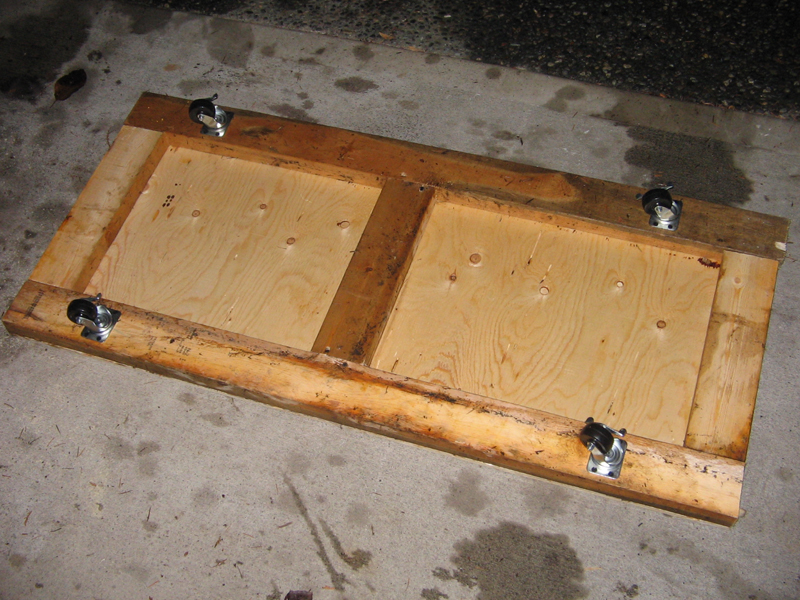
The wheels are rated for 120lbs each so they should be able to support the weight.
In this picture I have two C60 6speed transmissions on it and it rolled around very nicely. Let’s hope it can support the weight. It only has to work for ONE minute!
Date: Friday November 28th 2008
Music: None
Money spent to date: $34.68
Hours spent to date: 6.5 hours
So I need something to lower my engine and tranny onto and roll it out from under the car. A proper engine and tranny dolly will cost over $200 and frankly I do not have the money for it. So I had to compromise. I decided to make my own dolly to lower my engine on and ROLLLLLL out from under my car.
So I went and bought $34.68 worth of wood and wheels....
And then turned it into this….
The wheels are rated for 120lbs each so they should be able to support the weight.
In this picture I have two C60 6speed transmissions on it and it rolled around very nicely. Let’s hope it can support the weight. It only has to work for ONE minute!
-Matt
89 MR2 SuperCharger SuperEdition= SOLD
86 Corolla GTS= Daily Driver
89 MR2 SuperCharger SuperEdition= SOLD
86 Corolla GTS= Daily Driver
-
4agzeSE - MR2 Veteran
- Posts: 4053
- Joined: Wed Aug 31, 2005 10:50 am
- Location: Sunrise Toyota Abbotsford
- Status: Offline
Re: Project 4AGZE Restoration
![]() by bbarnumboy » Sat Nov 29, 2008 4:13 am
by bbarnumboy » Sat Nov 29, 2008 4:13 am
matt u r a picture freak lol... now get that thing out and get it inside where it is warm and u can sit there pondering with a cup of hot cocoa a book and some bifocals by the fire about how your gonna do the process. u could do it in less than 6 layers indoor. even no layers if u preferred 
God created turbo lag to give the v8's a brief moment of hope
-
bbarnumboy - MR2 know it all
- Posts: 3097
- Joined: Sat May 06, 2006 12:08 pm
- Location: Everett, WA
- Status: Offline
Re: Project 4AGZE Restoration
![]() by abbyjake » Sat Nov 29, 2008 11:35 am
by abbyjake » Sat Nov 29, 2008 11:35 am
Matt, it must be taking twice as long to do the work if you take a picture at each step -- it's great tho -- reminds me of pulling out my engine (which is back in and I'm taking my time hooking everything back up). I used a 3/4" piece of plywood rolling on several lenghts of 1/2' tubing -- you just need to keep taking them from the back and putting them in front as you roll the piece of plywood with the engine/tranny on it. I wanted to keep the whole thing as low as possible, and it worked great.
- Jake
87 MR2 | 00 Tundra | 02 Celica
87 MR2 | 00 Tundra | 02 Celica
-
abbyjake - Baby '2
- Posts: 93
- Joined: Mon Oct 09, 2006 8:59 pm
- Location: Chilliwack
- Status: Offline
Return to Members MR2's & Build Threads
Who is online
Users browsing this forum: No registered users and 2 guests